
Hanging Planter DIY
by Rhiannon James
Classic macramé plant hangers are firmly back in fashion and are perfect for people who are short on surface space. Stylist Joanna Thornhill, author of Home For Now: Making your rented space or first house beautiful shows how cheap and easy it is to make your own with this simple project using standard garden twine.
You will need
8-12 metres of coloured twine
A plant in a pot
Superglue (optional)
Step-by-step
1. The first thing you need to do is to cut eight equal lengths of twine (equaling 8-12 metres in total depending on the size of your pot).
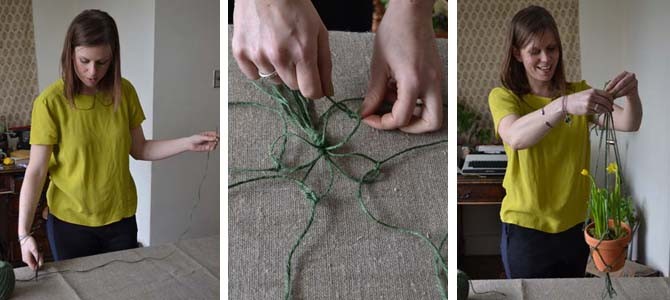
2. Next, tie them together with a knot at one end to make the base of the holder, leaving about 10cm of twine trailing from below the knot.
3. Separate the lengths of twine into four sets of two and arrange them in a cross shape.
4. Take the first set of two and make a double knot about two thumb widths higher than the base knot. Then repeat with the other three sets so you end up with a shape like a four-leaf clover.
5. Next, take the right-hand strand from one set and the left-hand strand from the set on its right and make a double knot about two thumb widths higher than your last knot. Repeat with the rest of the strands to create a diamond shape.
6. Then repeat this stage – taking the right-hand strand from one set and the left-hand strand from the set on its right and making a double knot until you have formed a square shape.
7. For a larger pot, repeat the process again. Otherwise, place your pot in the middle of your knotted square, gather up the remaining lengths of twine and tie a secure knot at the end for hanging. The plant pot should fit snugly within its holder. To strengthen the holder, you can squeeze superglue into both knots but make sure it doesn’t dribble out.
8. Hang your plant pot from a nail or hook in the ceiling or wall.
This project is taken from Joanna’s book Home For Now, published by Cico Books. It was photographed at the Flower Council of Holland’s Green Open House event.