
How to create and maintain a herbaceous border
by Drucilla James
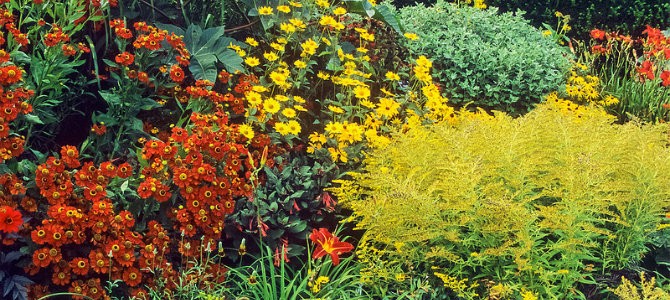
Credit:UK Garden Photos
Herbaceous plants with their great variation in size, texture and colour can bring interest and drama to any garden space. They generally die back over the winter, start growing in spring and flower from May to October or even through to December. Some of the more architectural forms and seed heads provide attractive features through the winter too, especially when edged with frost. Our simple instructions will help you establish your border and keep it looking good for years to come.
Planning your patch
Spring is a good time to create or re-plan and replant your herbaceous patch, whatever size, bearing these principles in mind:
- Try to create a frame for your border -a wall, a hedge, a fence or some other feature behind it.
- Plan your border to include stand-out plants to act as focal points and initial areas of interest, and then for the eye to move through the border along the lines of planting.
- Select plants for their complementary or contrasting colour, height, spread, texture of flowers and foliage and capacity to create flow lines through your scheme.
- Ensure the size and spread of your plants is in scale with the size of your plot and will make a sensible progression from the back to the front of the border from high to low.
- Remember that the design of your border is very much like creating a painting, using the wide range of plant forms, shapes, and colours at your disposal.
Maintaining the border
Often gardeners are concerned that herbaceous borders require intensive care and are lots of hard work but they only really require the kind of on-going maintenance which is common to most areas of the garden including:
- Keeping the weeds down – see: http://www.cityplanter.co.uk/practical/how-to/how-to-get-rid-of-weeds
- Mulching - check out details here: http://www.cityplanter.co.uk/practical/how-to/how-to-mulch
- Pruning/ cutting back the more vigorous plants to give the more delicate growers a chance to thrive;
- Dead-heading - removing fading flowers and foliage –see how here: http://www.cityplanter.co.uk/practical/how-to/deadheading-how-and-why-to-remove-fading-flowers
- Staking plants early to support them as they grow so that they don’t collapse. See our instructions here: http://www.cityplanter.co.uk/practical/how-to/how-to-stake-plants
- Cutting the clumps down to just above soil level after flowering;
- Splitting/dividing plants to get rid of the unproductive bits at the centre and to give the more vigorous growth at the edges a new lease of life. This can be done at almost any time of year but is best in autumn (if the soil’s not too wet or frozen) or early spring, when they’re dormant (although some spring-flowering plants such as irises are best divided in summer). See: http://www.cityplanter.co.uk/practical/how-to/how-to-divide-perennials
Step by step
- Clear the area of all weeds and dig it over with a border fork adding compost and some horticultural sand and fertiliser such as bone meal. Herbaceous plants like a free draining, rich, water-retentive soil.
- In an existing plot, divide established herbaceous border plants to form smaller clumps. They can be split into lots of small sections to get the maximum number of new plants or they can be divided just a few times to produce bigger, more mature specimens. Just make sure every section has at least a few strong fibrous roots, some stem and some buds or shoots. If the crown is large or too tough to tease apart by hand, use a pair of border forks. For more details see: http://www.cityplanter.co.uk/practical/how-to/how-to-divide-perennials
- New planting or adding new plants. Water all the plants thoroughly. Arrange your plants as in your plan starting with the tallest and ending with the shortest at the front ensuring they are in the planting pattern you want.
- Start planting at the back of the border, dig a hole to fit the size of the root ball and to a depth where the compost level of the pot will be level with the soil, tap the plant out of the pot, tease out the roots at the base. Place the plant in the hole and fill in the sides and firm gently. For more detail see: http://www.cityplanter.co.uk/practical/how-to/how-to-plant-perennials
- Carry on, repeating the process following your border plan.
- Water the border. Water the plants in well and don’t let them dry out while they’re settling in.
Plants we used
Back:
Cynara cardunculus (Cardoon) 2 x 1.5 metres to create a focal point
Middle back:
- Lychnis coronaria 90 x 30 cms,
- Monarda ‘ Cambridge Scarlet’ 80/90 x 45 cms
- Achillea ‘Strawberry Seduction’ (red) 70 x 80 cms
Middle:
- Rudbeckia sullivantii 60 x 45 cms
- Anthemis ‘Sauce Hollandaise’ 60 x 60 cms
Middle front:
- Dicentra spectabilis 60 x 45 cms
- Penstemon ‘Firebird’ 60 x 45 cms
- Sedum ‘Autumn Joy’ 60 x 60 cms
- Coreopsis ‘Sunfire’ 50 x 50 cms
Front:
- Papaver orientale ‘Royal Wedding’ (white) 40 x 40 cms
- Stachys lanata 30 x 60 cms
As this was a small area, 2 m x 2.5m, we only used one of each plant, but in a larger area they would be planted in threes.
Annie
13 Mar 14 11:23
I have a rockery I live in an inner city there was a R.T I cannot say the word as I hate them… the rockery was abandoned for years but is mow in a hood condition the R appearsto have gone I want to keep it that way and grow flowers and herbs and greenery ….any HELP welcome
Annie