
How to make a lawn
by Drucilla James
Now is the time to get started if you wish to create a new lawn or add some new sections to an existing area. A lawn made using seed or turf can be an inexpensive way of giving a quick face-lift to your garden.
Things you’ll need:
- Garden fork
- Garden rake
- Ball of string
- Wooden pegs
- Hammer
- Spirit level
- Tape measure and straight edge
- Weedkiller
- Growmore fertiliser
- Plank or wooden board
- Peat and sand mixture
Step-by-step
Lawn from seed
Advantages:
(1) Lower cost
(2) Availability of different mixes to suit the location of your lawn
(3) No heavy turves to handle
(4) Seed doesn’t have the same time constraints as turf which has to be laid quickly once you’ve bought it
Disadvantages:
(1) Careful preparation is needed in advance of sowing
(2) Removing weeds is crucial and there is always the risk of weed invasion until the grass is well-established
(3) The lawn needs to be left for a long period, about a year, before it is suitable for heavy use
Buy the grass seed mix most appropriate for your location- e.g. sunny or shady, dry sandy soil or a clay-type soil….
The best time for sowing is through September to mid-October as the soil is still warm and the risk of drying out is minimal
Step 1
Dig thoroughly the area where the lawn is to be located to about 20 cms but avoid bringing up the subsoil. The soil needs to be fairly dry. Make sure all weeds and particularly deep-rooted perennials are removed. If the soil is poor quality, peat and sand can be added at this stage.
Step 2
Break up the clods and rake the soil level.
Step 3
To ensure soil is level take the following steps. Take a wooden peg and mark a line 7cms down from the top. Hammer the peg into the ground and repeat this with a second peg a metre away for a small lawn area - the pegs will need to be much further apart for a large lawn. With a spirit level make sure this second peg is level with the first. Repeat with the other pegs using a straight piece of wood for longer distances.
Step 4
If possible leave the soil to settle for as long as you can but no less than a week.
Step 5
Consolidate the soil further by trampling over it as if treading grapes- the soil needs to be dry when you do this. Work in straight lines in one direction, then repeat the process at right angles to the original direction.
Step 6
Rake the soil again to develop a very fine soil tilth, leaving very shallow furrows on the surface fine enough for seed to be planted. If necessary, spray the area with weedkiller (use a glycophosphate weedkiller that will allow you to seed the area after 24 hours).Add about 50 gms of Growmore to each square metre.
Step 7
Use string to divide the area into one metre strips and divide those into one metre sections so you have readily visible squares one metre in size. A cane can be used for this as it can be moved along by a metre as each square has been seeded.
Step 8
Scatter the seed as evenly as you can by sweeping the hand back and forth over a small area at a time. Sow half the seed in one direction across the square and the other half in the opposite direction.33 gms of seed (approximately a handful) will cover a square metre. Many boxes of seed now come with a sprinkler side to them. If you are sowing a very large lawn it may be worthwhile hiring or borrowing a fertiliser spreader.
Step 9
Very lightly rake the seeds into the fine soil
Step 10
Keep the soil moist until the seed has germinated; if there has been no rain within the first few days, use a sprinkler to gently water the site until growth is established. Seedlings will appear in one to three weeks. When the seedlings are 2 to 3 inches high the top half inch can be removed by mowing.
You’re done! Except, look out for the birds as they can decimate the planting. A network of cotton thread can be formed above the seed bed to protect it.
Laying a lawn using turf
Advantages:
(1) Quicker result and more convenient
(2) The edges of the lawn can be more quickly defined
(3) Quicker to come into use
(4) Preparation of the soil is less arduous
Disadvantages:
(1) It is more expensive.
(2) It is more difficult to get grasses that meet the needs of a particular location in the garden.
(3) Turf has to be laid fairly quickly and if kept for any length of time needs to be kept unrolled and moist.
To ensure you buy the best turf available, make sure there is good colour over the whole piece, there are no weeds and it has good soil without stones. Check down into the grass that there is no thatch and also that there are no signs of disease.
The process for laying turf is very similar to that followed for seed.
Step 1
Mark out the area to be turfed using string or lines of sand. Prepare the soil as described for seed – up to and including step 6-creating a consolidated base with a fine tilth.
Step 2
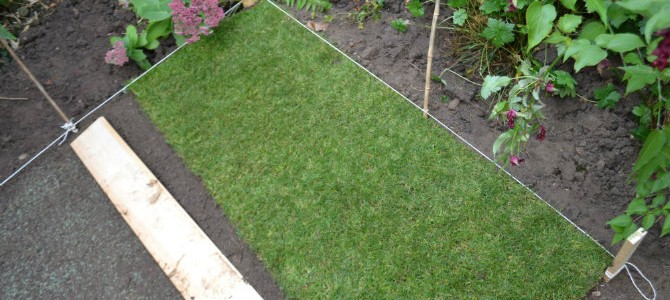
Using a length of string between two pegs create a straight edge and lay the first length of turf along it.
Step 3
Use a plank to stand on as you lay the row of turf alongside the first. Stagger the joints as you would see in a brick wall.
Step 4
Tamp down each row of turf using a ‘tamper’ made from a thick square of wood with a pole handle, the back of a rake or another plank to walk along. Check the level each time.
Step 5
Move the plank to lay the next roll of turf. If you have to use a small piece of turf make sure this is used inside a row and not at an edge.
Step 6
When all the turf has been laid, brush a mix of peat and horticultural sand into the joints so that any gaps are filled.
Step 7
At some point later you can cut the laid lawn to shape.
You’re done! Start your lawn care programme in the spring.